Table of Contents
Introduction
Riichi Mahjong (or simply Riichi) is a japanese variant of the traditional chinese game. It’s a board game played with tiles by four players where each player tries to complete their hand in order to score points off other players. The game has some similarities with Rummikub, Rummy or Poker.
The game can be fairly complex for a beginer to learn by themself. We recommend that you come meet us in person if possible, as we would be happy to introduce you to the game in a friendly atmosphere, with the pleasure of using real tiles to play. Otherwise, you can find on this website the base rules as well as other resources you can download. You can also learn how to play through online games which include easy to follow tutorials and a quick way to learn by practice anywhere, anytime, with real players online. We recommend for this the excellent Mahjong Soul developped by Catfood Studios / YoStar and available for free on your browser or mobile platform of choice.
The tiles
Riichi is played with 34 different tiles, each in 4 copies, for a total of 136 tiles. The majority of tiles are numbered 1 to 9, in three suits:
Souzu (also called sou, bambous or sticks):


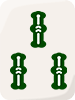


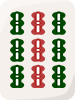
Note that the 1 of bamboo is represented by a bird, usually a peacock, instead of a single stick.
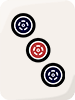
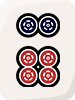
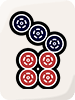
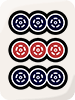
Pinzu (also called pin, circles, dots, wheels)


Manzu (also called man, characters)


The numbers are represented by their chinese/japanese characters, which you’ll need to remember.
Besides the three main suits, there are also tiles we call “honor tiles”, divided into two groups:
Winds


East, South, West and North, respectively.
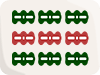
Dragons
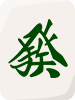


Green, Red and White, respectively.
Riichi Mahjong doesn’t use flower tiles or season tiles (although season tiles are typically included in Riichi sets) found in chinese Mahjong, nor does it include Joker tiles from american Mah Jongg. An optional rule, which is generally admited in traditional play but omitted in tournament play, allows replacing number 5 tiles by red 5s, usually one per suit.


The hand
Each player receives 13 tiles to form their hand, which they keep hidden from other players by standing them upright so the back is facing others. At the start of their turn, a player draws a tile from the wall, temporarily bringing their hand to a count of 14 tiles. A player can also under some conditions claim a tile discarded by another player to add to their hand, also bringing their hand up to 14 tiles. The goal is to form a hand composed of 4 groups of 3 tiles and one pair (3+3+3+3+2=14). A player whose hand is completely formed and contains at least one valid yaku (see below), can declare victory. Otherwise, the player discards a tile and yields the turn to the next player (on their right).
The goal is to form these groups of tiles, called melds, in order to form a complete hand. The different possible melds are as follow:
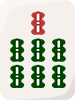
Sequence (or chii, shuntsu, run)
These are the easiest melds to form, and are composed of three consecutive numbered tiles in the same suit.
These melds cannot mix tiles from different suits. They also do not loop around from end to start of the possible numbers, and can’t contain honor tiles. These examples are not valid runs:
Triplet (or pon, koutsu)
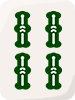
A triplet is always a group of three identical tiles, of any kind:
When red 5s are used in play, these are considered identical to other 5s of the same suit and can form a triplet with them.
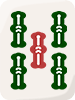
Quadruplet (or kan, kantsu, quad)
A quad is always formed of 4 identical tiles, of any kind:
Since a quadruplet uses 4 tiles instead of the usual 3, it must always be declared and set aside, so that the player can receive a replacement tile from the dead wall in order to restore the proper tile count in their hand. When a player has 4 identical tiles in hand, they don’t have to declare the quad immediately and can instead wait another turn to do it, or choose to discard the 4th tile to keep only a triplet in hand, or even use the 4th tile in a separate meld. Lorsqu’un joueur a 4 tuiles identiques en main, celui-ci n’est pas obligé de déclarer immédiatement le carré, mais peut attendre de le faire plus tard, ou aussi se défausser de la 4e tuile pour le réduire en simple brelan. When red 5s are used in play, these are considered identical to other 5s of the same suit and can form a quad with them.
Example of a complete hand
This hand is composed of a 234 sequence in bamboos, a 789 sequence also in bamboos, a 555 triplet of characters a triplet of red dragons and a pair of West winds. The hand therefore has 4 melds and a pair, and also a victory condition (yaku, see below). This hand can be declared winning.
Playing
At the start of the game, tiles are shuffled case down, theen stacked in rows which are called walls (see the end of this page for detailed setup instructions if playing with real tiles, rather than online). Once the starting hands are dealt, the dealer draws first from the wall (this very first draw is often done during tile distribution). Either they have a complete hand and can declare victory, or they discard a tile of their choice and place it in front of them in their discard pile, face up. Discards are always lined chronologically from left to right in the order they were discarded, in rows of 6 tiles.
When a player discards a tile, the other players can call if they wish to claim the discarded tile to complete a meld. They then reveal the tiles from their hand that complete the meld and set them aside along with the claimed tile, face up on the right of their hand. The player who just claimed a tile must then discard, as if they had drawn at the start of their turn, and yield the turn to the next player on their right, skipping anyone between the player discarding and the one calling. A meld formed by calling a tile is locked out of the hand (but is still part of it as a whole), and can no longer be reintegrated in the hand or discarded.
If no one claims the discarded tile, then the next player plays their turn. This is the player on the right of whoever just played, going counter-clockwise around the table (this is opposite from most western board games). This next player will then draw a tile and try to form a complete hand with it, declaring a win or discarding a tile otherwise, allowing other players to call the discarded tile, and so on.
The game continues like this until either someone declares a victory, or all the available tiles are drawn (except the dead wall, the last 14 tiles). In that case, the hand ends in a draw, and players must declare whether their hand was ready to win (tenpai) or not (noten). A hand is ready (tenpai) when it’s waiting on just one tile to be complete, whether it has a victory condition (yaku) or not. If they dealer is tenpai, they retain dealership for the next hand, otherwise the player on their right becomes dealer next. A regular game runs through two rounds, East and South. The game begins on the East round, and once the initial dealer becomes dealer again a second time, the game proceeds into South round.
Example of a ready hand (tenpai)
The folowing hand has 3 runs in bamboo, and two pairs of dragon tiles. The hand would be complete if the player draws or calls either a 3rd white dragon or a 3rd red dragon in order to complete a triplet and a pair. This hand is thus currently tenpai, waiting on the correct 14th tile to win. It also contains a yaku and can be declared winning howevery way it’s completed.
Calling Tiles
When a player discards a tile, other players can claim it if it completed a meld in their hand, or allows them to complete their hand and win. The different calls are as follow:
Chii
This is the call to complete a sequence with the discarded tile. A chii call can only be made on the tile discarded by the player on your immediate left. When forming this meld, the tile that was stolen is rotated sideways. This way, we know which tile was taken from the player on the left, as it is still tecnically part of their discards. For example:


Pon
This is the call to complete a triplet with the discarded tile. A pon call can be made on a tile discarded by any player at the table. When forming this meld, a tile is turned sideways according to which player it was claimed from. This way, we know which player’s discard pile the tile originates from, as it is technically still part of their discards. For example:

Tile claimed from the player on the left

Tile claimed from the player in front

Tile claimed from the player on the right
Kan
This is the call to complete a quadruplet with the discarded tile. A kan can be called on a tile discarded by any player at the table, or when in possession of all four copies of the same tile. When forming this meld by claiming a discarded tile, a tile is turned sideways according to which player it was claimed from. This way, we know which player’s discard pile the tile originates from, as it is technically still part of their discards. When forming the meld with all four tiles in hand, we first reveal all four tiles before flipping the edge tiles (or center tiles, both forms are accepted) and setting the meld aside on the right of the hand. In this case, the meld is still considered closed. A last way to call kan is by drawing a fourth tile identical to an existing triplet formed by calling pon , thus improving the triplet into a quadruplet. The fourth tile is added to the meld by placing it sideways above the one that is already sideways from the previous pon call. In any case, after a kan, it’s necessary to draw a replacement tile from the dead wall before discarding, and a new dora indicator is revealed (see below). A maximul of 4 kan are allowed during a game, as it’s not possible to distribute further replacement tiles, or reveal additional dora indicators after that. Here are some examples:

Tile claimed from the player on the left

Tile claimed from the player in front

Tile claimed from the player on the right

Concealed Kan (4 tiles in hand)
Improving a triplet into quad
Ron
This is the call to declare victory when the hand is tenpai and any other player discards a tile needed to complete it. A ron call can be made on any player’s discarded tile, but the hand must containt at least one yaku. After calling ron, the winning player reveals their entire hand, leaving the discarded tile where it is (it should not be taken from that player’s discard or included into the hand).
Tsumo
This is the call to declare victory when the hand is tenpai and the tile that completes it is drawn by yourself. If the hand is open, it must containt at least one yaku. After calling tsumo, the winning player reveals their entire hand, keeping apart the tile that was just drawn. It’s important not to integrate the tile into the hand, as this impacts the ability to correctly identify the hand’s shape and waits, and thus count the hand’s value.
Open & Closed
A players’ hand can be described as open or closed (concealed). The hand is concealed at the start of the game, as long as the player doesn’t call pon, chii or kan to claim a tile from another player’s discards (the concealed kan described above retains the hand’s closed status). When a tile is claimed from another player’s discard and the resulting meld is set aside, the hand is considered open.
This notion matters since many victory conditions (yaku) are either invalid or worth less if the hand is open. A closed hand offers more possibilities to shape it, and is overall usually worth more than an open hand. Furthermore, a closed hand won by self-draw (tsumo) affords an extra yaku for maintaining the whole hand concealed.
We advise new players to keep their hand closed as much as possible and to use calls only when they are certain that the hand will contain a valid yaku after being opened. Calls can accelerate forming your hand by using other players’ discards in addition to your own drawn tiles to form melds faster, but this invalidates some yaku and is detrimental to the hand’s value, flexibility and ability to defend against other players.
As with the state of the han as a whole, individual melds can be described as open or closed, according to whether they were formed by claiming tiles from other players, or made wholly from drawn tiles. The yaku Sanankou (Three Concealed Triplets) is valid only if the hand contains three triplets that are closed, however the fourth meld can be open. Be careful when calling ron to declare victory, as the meld formed from the discarded tile is considered open and can not be considered for this yaku.
Winning
A winning hand is composed of 14 tiles (not counting the extra tiles when forming kan), which are almost always four melds and a pair (some exceptions exist). One crucial condition in order to declare victory is that the hand must also contain a minimum of one valid yaku. A yaku is a characteristic in the shape of the hand that is awarded value. There exists several and they can be stacked to add value to a hand.
For a begining player, the following yaku are easy to remember and easy to achieve, and most of them are valid in open hands except Riichi and the two hands with special shapes, which need to be closed. The tiles presented in the following examples are just that, examples; it’s the shape that matters, and not the specific tiles displayed:
Riichi
This is the core of Riichi Mahjong, and its mechanics are detailed below. In short:
- The hand must be closed (no melds formed from claimed tiles)
- The hand must be ready (tenpai)
- The player declares “Riichi” and discards his tile by placing it sideways, then places a 1000 points stick in the center of the table, in front of their discard pile
- The hand can no longer be modified
Honor Tiles (Yakuhai or Fanpai )
The hand must contain a triplet or quad of either a dragon, the dominant wind (East, South or West, corresponding to the round being played), or the player’s seat wind (determined by their position at the table relative to the dealer). The rest of the hand doesn’t matter.
All Simples (Tanyao)
The hand must containt only tiles from the three main suits, except tiles numbered 1 or 9 (called terminals), and no honor tiles. The melds matter little, as long as the tiles are all numbered between 2 and 8 (which are called simples).
All Triplets (Toitoi )
The hand must be formed with only triplets or quads and a pair, no sequence.
Mixed Triple Sequence (Sanshoku Doujun)
The hand must contain the same sequence in each of the three suits. The rest of the hand does not matter.
Full Straight (Ittsuu )
The hand must contain three sequences in the same suit forming 123, 456 and 789. The melds have to be formed this way, it’s not enough to just have all tiles numbered 1 through 9 in the hand. The rest of the hand doesn’t matter.
Half-Flush (Honitsu )
The hand must contain only tiles from the same suit and honors. The shape of the melds matters little, as long as there are no tiles from another suit.
Full Flush (Chinitsu )
The hand is entirely composed of times from the same suit, with no honors.
Seven Pairs (Chiitoitsu )
A special hand which is formed with 7 pairs instead of usual melds. This hand can only be closed, since there are no calls allowing to form a pair from a player’s discards.
Thirteen Orphans (Kokushi Musou )
A special hand consisting of one tile of each different terminal and honor tiles (13 in total), with any terminal or honor tile as a duplicate to complete the hand. It’s one of the most valuable hands, called Yakuman worth maximum value. In some rule sets, its value is doubled if won while the hand is waiting for all 13 possible tiles (that is, when it is tenpai with one of each 13 tiles, waiting on a duplicate).
It’s important to learn the most common yaku, and having a reference sheet on hand during play can help with the learning process. We prepared a reference sheet for beginners which is available for download on our website, along with other more complete sheets listing all possible yaku (not all are listed above).
Each yaku adds value to the hand, which is called han. Several yaku can be combined in one hand, and some yaku are worth more han than others. The hand’s point value is mainly determined by the total han count.
A player winds the hand by calling ron on a discarded tile, or tsumo on a self-drawn tile, when this tile completes their hand. It’s possible for several players to wait on the same tile to complete their hand, and to simultaneously call ron on a discarded tile. In that case, there are several winners, and the player who discarded the tile must pay each of the winning hands separately according to their respective values.
Declaring Riichi
Riichi is what distinguishes Riichi Mahjong from other variants of Mahjong, hence the name. When a player’s hand is completely concealed (closed, no tiles claimed from other players’ discards) and it is tenpai (ready to win, wating on the right tile), that player can declare riichi when discarding. To declare riichi, the player must announce it before discarding their tile, placing it sideways in the discard pile, and must place a 1000 points stick as a bet in the center of the table in front of their discard pile. The discarded tile is rotated in this manner so that all players can see when the riichi was declared as the game continues to progress. From that point on, it is no longer possible for this player to modify their hand. When their turn comes, if the drawn tile does not allow them to win, they must discard it. The only exception is when the drawn tile allows this player to form a concealed kan, which is allowed providing that this does not modify the hand’s waits. The player is then allowed to either declare kan or discard the tile, at their discretion. If the form of the hand and its waits are altered, then the kan is not allowed and the tile must be discarded.
A player who declares riichi must claim victory at the first opportunity, otherwise they are put in furiten state (see below). They cannot pass over a winning tile from one player in hopes of getting it again from another player, or in hopes of getting a different winning tile with better value.
Advantages of declaring riichi
- Riichi counts as a yaku, which increases the hand value and even lets a player win with a hand that otherwise doesn’t have other yaku.
- It allows for potentially another yaku, Ippatsu (Unbroken), if the player wins on the first set of turns following their riichi declaration (providing that no pon, kan or chii have been called by other players in-between) which further increases the hand value.
- The hand being concealed as a requisite for riichi, a self-draw victory (tsumo) affords another extra yaku: Menzen tsumo (Fully Concealed Hand), further increasing the hand value.
- The hand’s value can further be increased by uradora (see below), which are revealed only when a player wins by riichi.
- Riichi informs other players that the hand is tenpai and pushes them to fold, reducing he probability of another player winning their hand.
Disadvantages of declaring riichi
- Riichi informs other players that the hand is tenpai and pushes them to play defensively, reducing the odds of them discarding the tile you need.
- A hand in riichi can no longer be modified, losing the possibility of improving it furter. A player in riichi drawing a tile that would improve their hand is forced to discard it.
- The player in riichi loses their 1000 points bet if they fail to win the hand.
- The player in riichi is forced to discard tiles that don’t grant victory, however dangerous they may be, which affords more opportunities for other players to win.
While the disadvantages of riichi may seem heavy compared to its advantages, the additional yaku and uradora can significantly increase the hand value, and it’s generally more interesting to declare riichi than not. It is better to avoid declaring riichi if the hand value is already high on its own without it (to avoid putting other players on high alert), or if it’s obvious that another player’s hand has a high value or is close to being ready (to avoid losing control over your discards and dealing into others’ hands). When a player is tenpai but chooses not to declare riichi, they are said to be in dama or damaten.
The Dora
Another difference between Riichi Mahjong and other Mahjong variants is the use of dora. Dora are bonus tiles that add value to the hand, but are not in themselves yaku. There are different types of dora:
Dora
At the start of a hand, one of the dead wall’s tiles is turned face up, which we call the dora indicator. The actual dora is always the tile that follows, in order, the indicator in the dead wall. For example, if the indicator is a 6 of bamboo, then the dora is the 7 of bamboo (this is done to allow a full set of 4 dora tiles in play, otherwise if the tile in the dead wall was itself the dora, there would be one less in play). In the three main suits, the order is obvious, and loops on itself. A 9 in the dead wall would indicate that the dora is a 1 (in the same suit). For honors, the order is more arbitrary:
>
>
>
>
> …
This is the same order as players’ seats around the table
>
>
>
> …
Note that the first letters of green, red and white are in alphabetical order, which is the same
If a tile is a dora, it’s used in the same way to form the hand. When a player wins their hand, each dora in the hand adds one han to the hand’s value. Be careful that dora do not count as yaku! The hand still needs at least one valid yaku in order to win.
Kandora
When a player calls a kan, a new indicator is revealed on the dead wall, adding another dora to the previous. These extra dora work exactly like the first one and are called kandora. It’s possible for the same indicator to show up more than once. In that case, dora tiles count as many times as there are indicators pointing to them, adding even further value. A maximum of 4 kan are allowed at once, as it’s not possible to provide replacement tiles or reveal other dora indicators beyond that.
Uradora
When a player wins the hand by declaring riichi, they can reveal the tiles underneath all the visible dora and kandora indicators, which will also become dora indicators, called uradora (or hidden dora). The more kandora are revealed, the more uradora there will be as well, which can allow a hand in riichi to blow up in value when kan are called, one of the biggest advantages of declaring riichi. Uradora behave like the base dora, except that their value is only added to hands won with riichi. If several players call ron on a discarded tile, only those having declared riichi can add the uradora value to their hand (even though they are revealed for all to see) .
Akadora
if red 5 tiles are in play (replacing an ordinary 5 in each suit, see above), these are treated like dora and are called akadora. While akadora aren’t used in tournament play, they are common in traditional play. If the dora indicator is a 4, then the corresponding red 5 counts both as a dora and akadora, further increasing the hands value.
Furiten
The last characteristic of Riichi Mahjong that sets it apart from other Mahjong variants is furiten (sacred discard). When a player is in furiten, they are not allowed to call ron on another player’s discard to win the hand, however they may still win by self-draw (tsumo). A player can end up in a state of furiten in three ways:
- If a player previously discarded a tile that would currently complete their hand, they are in furiten until the hand is reshaped to no longer wait on tiles in their discard.
- If a player passed over a tile that completed their hand while in riichi, they are in furiten until the end of this hand.
- If a player (not in riichi) passed over a discarded tile that completed their hand, whether they could win on it or not, they are in temporary furiten until their next discard.
It’s important to note that furiten is a state that applies to a player and their hand as a whole, and not just a specific tile. A player may be in furiten because of one specific tile in their discards, but this means they cannot call ron on any discarded tile whatsoever. For example, a player with a tenpai hand waiting on either a 4 or 7 bamboo around an incomplete set of 56 would not be able to call ron if a 4 of bamboo is among their discards, even if the tile discarded by another player is a 7. This is particularly sensitive if only one of the hand’s waits is able to provide a yaku. For example, if a player with an open tenpai hand which only has a possilble Tanyao (All Simples) is waiting on a 4 of characters to complete a set of 23, they have a risk of drawing the 1 of characters, which also completes their hand but does not allow them to declare victory, for lack of a valid yaku. They would have to discard a tile and continue playing, putting themselves in furiten in the process (regardless of which tile they discard).
The furiten rule allows defensive play, because all players have a clear view of every other player’s previous discards. When facing an opponent’s riichi, or a player who has made several calls and is likely tenpai, it is certain that they cannot call ron on any of the tiles in their discard pile, making these safe to discard to avoid dealing into their hand (other players might still be able to win from these, however!).
Furiten only forbids declaring victory by ron. Other calls remain possible. A player in furiten may very well call chii or pon on a tile that would complete their hand, and thus continue to shape their hand towards different waits that would relieve them of furiten, and they may still call tsumo to win by self-draw. Calling ron while in furiten usually entails a penalty called chombo, the severity of which depends on the specific rule set. When playing online in video games, it’s generally not possible to make incorrect calls.
It’s also important to note that tiles that were claimed by other players are still technically part of your discard and must be considered when evaluating furiten. This is the reason why tiles claimed from other players’ discards are always rotated in the resulting meld, to preserve the association to the correct discard pile.
Scoring
Counting points is one of the harder aspects of playing in person with real tiles. The hand’s value is determined mainly by the number of han, but also by a number of mini-points based on the shape of melds and type of waits and victory, called fu. The combination of han and fu, as well as the type of victory (ron or tsumo), and the seat wind of the winning player (East or other) all affect the points count and how they are exchanged between players. This is an afterthought when playing online, as the game’s code will handle everything in your stead. In person, more experienced players will generally do the counting, but it’s a good idea to double-check to prevent mistakes and abuse. We provide a complete table available for download on our website, ready to print and use during play.
For beginners, a gross estimate of a hand’s value is sufficient enough. This can be approximated well enough using only han count and seat wind, omitting fu entirely :
| Han count | Dealer win (Est) | Non-dealer win (other) |
|---|---|---|
| 1 | 1500 (500) | 1000 (500 / 300) |
| 2 | 3000 (1000) | 2000 (1000 / 500) |
| 3 | 6000 (2000) | 4000 (2000 / 1000) |
| 4,5 (Mangan) | 12000 (4000) | 8000 (4000 / 2000) |
| 6,7 (Haneman) | 18000 (6000) | 12000 (6000 / 3000) |
| 8,9,10 (Baiman) | 24000 (8000) | 16000 (8000 / 4000) |
| 11,12 (Sanbaiman) | 36000 (12000) | 24000 (12000 / 6000) |
| 13+ (Yakuman) | 48000 (16000) | 32000 (16000 / 8000) |
The values in bold correspond to the points the winner receives from the player who dealt into their hand in case of ron, while the values in parenthesis correspond to the points all three other players must pay the winner in case of tsumo. The dealer gets 50% more points when winning their hand, but must also pay a higher sum if another player wins by tsumo (this is why the non-dealer win comlumn shows two values in parenthesis: the larger one is for the dealer to pay while the smaller one is for everyone else to pay).
Note that when winning by ron, the player who discarded the winning tile has to pay the entirety of the hand’s value, which is even worse if the winner is the dealer (East player). This is why it’s important to be mindful of furiten and defensive play to avoid dealing into opponents’ hands when they can obviously win big with riichi or visibily well-developped hands.
In case of a repeat after a victory by the dealer, or if the hand ends in a draw, a counter is placed on the table, called honba. For each counter, the hand value is increased by 300 points. Counters are removed once a hand ends by another player’s victory. When a hand ends in a draw, any riichi bets in play are put aside and are awarded to the next winning player in the following hand.
Ending the Game
The game typically ends when one of two conditions are met:
- The last hand of the South round is played (or East round if playing a short game)
- A player has a negative score
A common rule allows the game to continue if the dealer (the East player), wins the last hand of the last round (or if they’re tenpai in case of a draw), allowing repeats until they rank first, or until the time limit during tournaments where play continues even if the dealer reaches first place.
Another rule also allows the game to continue into an additional round (West round after South) if there’s no clear winner at the end of the last round, that is if no player has above 30000 points (in normal play where each starts with 25000 points). The game then ends when one of the players achieves a score of 30000 points or higher, or at the end of this extra round otherwise.
In EMA tournaments, the game continues even when a player’s score goes negative. Referees will then provide additional points to continue playing, which are deducted from that player’s overall tournament score, allowing the game to continue until the end.
Setting Up
While this is the first thing to do before playing, it’s not essential for every player at the table to know how to set up the game. When playing in person, in only takes one player who knows how to set up the game to guide the others. For online play, the process is entirely automated and invisible. Some games, like Mahjong Soul, don’t even display the walls on screen, choosing instead to show a simple counter to display remaining tiles, as well as a simplified display of dora indicators in the corner of the screen.
Before begining, players must be assigned their seats and play order, usually randomly. Traditionally this is done through the wind ceremony, which consists in placing one of each wind tile face down, shuffling them and letting each player pick one (the one who shuffled the tiles picks last). The player with the East tile takes place first, followed by the South, West and North players, counter-clockwise. They will play their turns in that same order, starting with the East player, who is the dealer. Alternatively, in casual play, the players can take seat anywhere and roll the dice to decide on who is East. Other players then get assigned their seat winds in counter-clockwise order, according to where they’re seated. Note that the orientation of the winds appears opposite to what is shown on a regular compass. This is because it represents the cardinal directions as you would see them if they were indicated on the celestial canopy and you lifted your eyes upwards to see them.
The first player to be dealer places a marker on their right hand corner of the table, which will remain there throughout the game, indicating both the current round (East or South) as well as where the game began. As the winds change during play, the dealer is identified by holding the dice on their side. The times are then shuffled at the center of the table, face down, then each player gatheers two rows of 17 tiles, stacked face-down on each other to form a wall. Each player pushes their wall towards the center of the table to form a square.
The dealer then throws two 6-sided dice in the center of the square to decide which wall will de brawn from first. Counting counter-clockwise and including their own wall in the count, the dealer counts up to the dice total to designate a player’s wall. For example, a roll of 5 points back to the dealer’s wall, while a 7 indicates the West player in front. The same dice roll is used to decide where to divide the wall, counting that many tiles from the right side of the wall (from the perspective of the player whose wall is picked). That player creates a separation in their wall, where the draw begins on the left side of the separation (from their perspective). An optional rule allows for the player whose wall was selected to roll the dice again to determine where to separate the wall, adding an extra layer of randomness.
The 14 tiles on the right-hand side of the separation (7 tiles long by two high), form the dead wall. This can extend into the neighboring player’s wall if the dice roll is low and the separation is close to the edge. The tiles on the left of the separation are where the draw begins. The East player begins drawing, by taking the first 4 tiles as a 2×2 block. The South player then draws the next 4 tiles in the same manner and so on, following the counter-clockwise order of play. Once every player has drawn 3 times (12 tiles in total), the East player takes the first and third top tiles, which correspond to their 13th tile and first play draw. The other players take one tile each (South takes the first lower tile, West takes the next top tile, and North takes the tile underneath). Every player then has 13 tiles except East which has 14 and can begin playing immediately without drawing again on their first turn.
The player whose wall was separated must reveal the dora indicator, which is the 3rd top tile in the dead wall (the first 2×2 tiles will serve as replacement tiles in case a kan is called, which are called rinshan and should not be revealed). To avoid accidentally knocking it off and revealing it, the first rinshan tile can optionally be brought down to the lower row next to the one underneath.
Players may then sort their hands, and the East player can begin playing. It’s generally recommended to wait until everyone has sorted their hand before the South player draws and discards, to prevent denying other players the chance to call on the East player’s first discard.
Tile illustrations created by FluffyStuff and used under Creative Commons Attribution 4.0 International license. The images were slightly altered (images recombined and slightly recolored)